
Quickstart (iOS)
The Roam iOS SDK makes it quick and easy to build a location tracker for your iOS app. We provide powerful and customizable tracking modes and features that can be used to collect your users’ location
Requirements
To use the Roam SDK, the following things are required:
Get yourself a free Roam Account. No credit card required.
Create a project and add an iOS app to the project.
You need the SDK_KEY (available in your project settings) to initialize the SDK.
You’re now ready to integrate the SDK into your iOS application.
The Roam iOS SDK requires Xcode 10.0 or later and is compatible with apps targeting iOS version 10 and above.
Run the example application
The Roam Example repository on GitHub includes example apps that demonstrate the use of the v3 Roam SDK for iOS.
See Swift's example app in Example/.
To run an example app, clone this repository, add your publishable YOUR-PUBLISHABLE-KEY key in AppDelegate.swift, and build the app.
Make sure the bundle_id is the same as the one registered on our Roam Playground dashboard.

Xcode Setup
To integrate the Roam SDK, you need a Roam account.
Go to Xcode > File > New Project
Configure the information property list file
Info.plistwith an XML snippet that contains data about your app. You need to add strings forNSLocationWhenInUseUsageDescriptionin theInfo.plistfile to prompt the user during location permissions for foreground location tracking. For background location tracking, you also need to add a string forNSLocationAlwaysUsageDescriptionandNSLocationAlwaysAndWhenInUseUsageDescriptionin the sameInfo.plistfile.<key>NSLocationWhenInUseUsageDescription</key> <string>Add description for foreground only location usage.</string> <key>NSLocationAlwaysUsageDescription</key> <string>Add description for background location usage. iOS 10 and below"</string> <key>NSLocationAlwaysAndWhenInUseUsageDescription</key> <string>Add description for background location usage. iOS 11 and above</string>
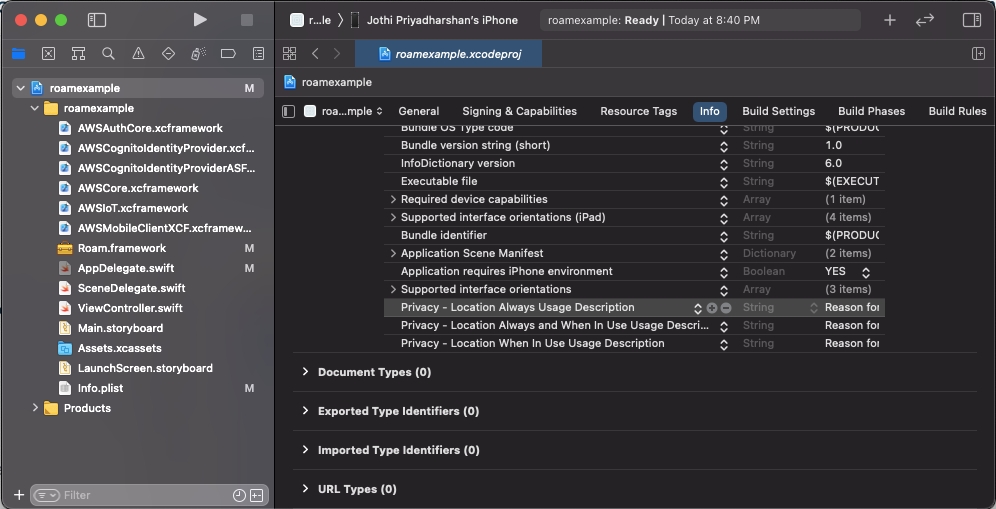
Next, you need to enableBackground fetch and Location updates under Project Setting > Capabilities > Background Modes.

SDK Installation
There are several ways to integrate the Roam Mobile SDK for iOS into your own project:
Swift Package Manager
CocoaPods
Carthage (Will be added soon)
Dynamic Frameworks
Swift Package Manager Installation
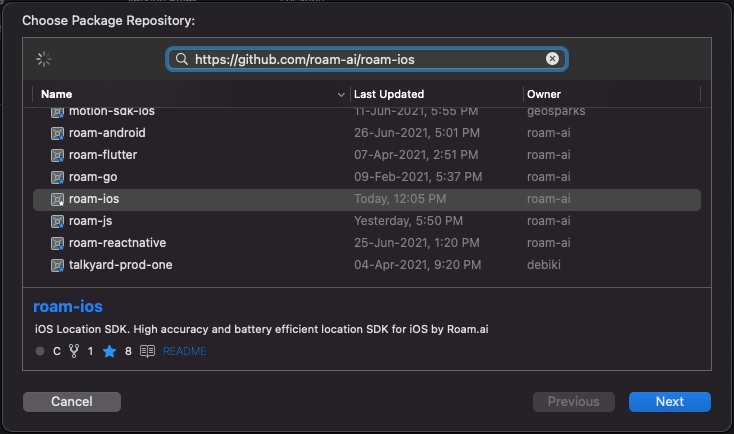
Swift Package Manager is distributed with Xcode. To start adding the AWS SDK to your iOS project, open your project in Xcode and select File > Swift Packages > Add Package Dependency.

Enter the URL for the Roam SDK for iOS Swift Package Manager GitHub repo (https://github.com/roam-ai/roam-ios) into the search bar and click Next.
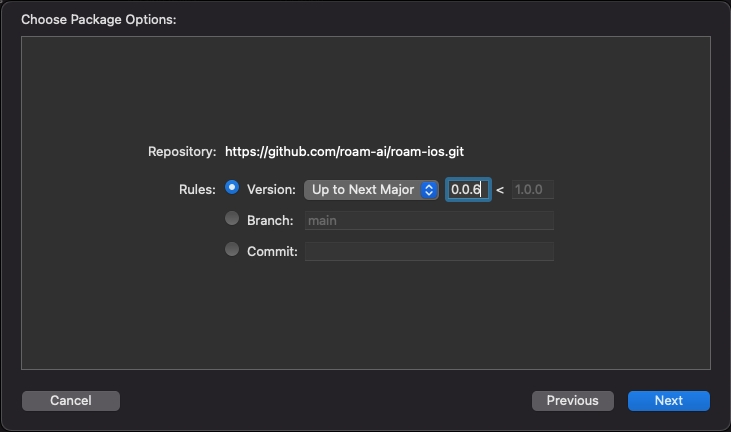
You'll see the repository rules for which version of the SDK you want the Swift Package Manager to install. Choose the first rule, Version, and select Up to Next Minor as it will use the latest compatible version of the dependency that can be detected from the main branch, then click Next.
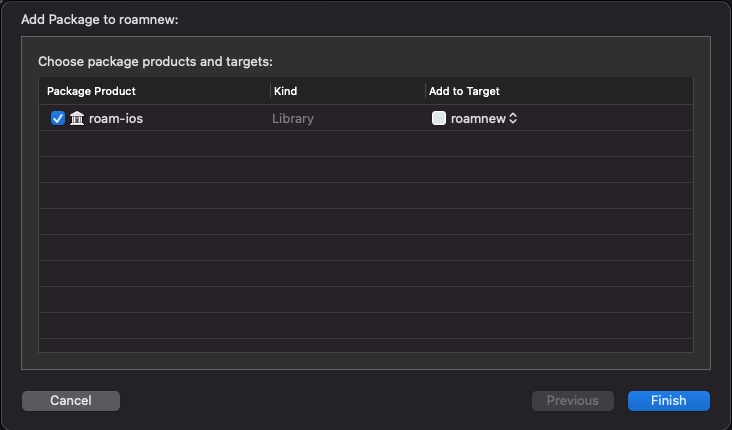
Select roam-ios, then click Finish.
You can always go back and modify which SPM packages are included in your project by opening the Swift Packages tab for your project: Click on the Project file in the Xcode navigator, then click on your project's icon, then select the Swift Packages tab.
CocoaPods Installation
Follow the steps below to add the SDK to the project using CocoaPods. Add the below to the Podfile
pod 'roam-ios'Then run pod install.
This will add the Roam SDK and its dependencies to your project. The Roam SDK depends on CoreLocation, AWSMobileClient and AWSIoT for fetching locations and its transmission to our servers. The SDK supports iOS 10 and above.
Manual Installation
If you’re not familiar with using Cocoapods or prefer manual installation, we’ve added a ZIP file to the SDK. Use this link to download the Roam.zip file.
Unzip the file and add the Roam Roam.framework to your Xcode project by dragging the file into your Project Navigator.
You can do this by selecting the project file in the navigator on the left side of the Xcode window, and then navigating to the Linked Frameworks and Libraries section. From there, click the “+” button to add the Roam framework. You will also want to add the following frameworks from this link.
AWSAuthCore.xcframework
AWSCognitoIdentityProvider.xcframework
AWSCognitoIdentityProviderASF.xcframework
AWSCore.xcframework
AWSIoT.xcframework
AWSMobileClientXCF.xcframework
Make sure the the added frameworks under Linked Frameworks and Libraries section are selected as Embed & Sign

Initialize SDK
Roam SDK offers a flexible method of initialization, allowing developers to seamlessly integrate our services into their applications. With our latest update, we've introduced a new initialization approach using property list files (plist). This method provides an effortless way to set up your Roam SDK without the need for additional code.
Using Property List (plist) Initialization:
Optional Parameter: Publish Key
The
publishKeyparameter in the initialization method is now optional.If you've added your Roam publish key to your project's
.plistfile, there's no need to pass thepublishKeyparameter during initialization.
Configure Your .plist File:
In your
info.plistfile, declare your Roam publish key as follows:
<key>ROAM_PUBLISH_KEY</key>
<string>$(ROAM_PUBLISH_KEY)</string>
Replace
"$(ROAM_PUBLISH_KEY)"with your actual Roam publish key.
Using XCConfig File (Optional):
Alternatively, you can use an XCConfig file to feed the Roam publish key to the plist file.
In your XCConfig file, add the following line, replacing
XXXXXXXXXXXXXXwith your Roam publish key:
ROAM_PUBLISH_KEY = XXXXXXXXXXXXXXInitialization Code:
Initialize Roam SDK in your application as follows:
Roam.initialize("")
// OR
Roam.initialize(nil)
If the publish key is added to the plist, the
initializemethod can be called without passing any parameters.
By following these steps, you can seamlessly initialize Roam SDK using property list files, simplifying the integration process and saving valuable development time.
Using AppDelegate Initialization:
Add the following code to AppDelegate file. This code imports the SDK and allows the SDK to use other methods.
import RoamAfter import, add the below code underapplication(_:didFinishLaunchingWithOptions:) in your AppDelegate file. The SDK must be initialized before calling any of the other SDK methods using your project's publishable key.
Roam.initialize("YOUR-SDK-KEY-GOES-HERE")Request Permissions
Before you start location tracking, you need to get permission from the user for your application to access locations.
Import
CoreLocationat the top of theAppDelegatefile.import CoreLocationMake the below class declaration for Location Manager and add this line before the return statement in
application(_:didFinishLaunchingWithOptions:)With this line, you ask users to allow the app to access location data both in the background and the foreground.let locationManager = CLLocationManager() locationManager.requestLocation()
Location Tracking
Start Tracking
Roam.startTracking(TrackingMode){ status, error in

}
Use one of the tracking modes while you use the Roam.startTracking method.
Stop Tracking
To stop the tracking use the below method.
Roam.stopTracking(){ status, error in

}
Tracking Modes
Adaptive Tracking
Roam has three default tracking modes along with a custom version. They are different based on the frequency of location updates and battery consumption. The higher the frequency, the higher the battery consumption.
Mode
Battery usage
Updates every
Optimised for/advised for
Active
6% - 12%
25 ~ 250 meters
Ride Hailing / Sharing
Balanced
3% - 6%
50 ~ 500 meters
On Demand Services
Passive
0% - 1%
100 ~ 1000 meters
Social Apps
//active tracking
Roam.startTracking(RoamTrackingMode.active){ status, error in

}
// balanced tracking
Roam.startTracking(RoamTrackingMode.balanced){ status, error in

}
// passive tracking
Roam.startTracking(RoamTrackingMode.passive){ status, error in

}
Distance Interval Tracking
The SDK also provides a custom tracking mode which allows you to customize and build your own tracking mode as per your requirement.
Type
Unit
Unit Range
Distance Interval
Meters
1m ~ 2500m
Distance between location updates example code:
// Define a custom tracking method
let distanceTrackingMethod = RoamTrackingCustomMethods()

// Update the settings for the created method as per need
distanceTrackingMethod.activityType = .fitness
distanceTrackingMethod.pausesLocationUpdatesAutomatically = true
distanceTrackingMethod.showsBackgroundLocationIndicator = true
distanceTrackingMethod.useSignificant = false
distanceTrackingMethod.useRegionMonitoring = false
distanceTrackingMethod.useVisits = false
distanceTrackingMethod.accuracyFilter = 10
distanceTrackingMethod.desiredAccuracy = .kCLLocationAccuracyNearestTenMeters

// Update the distance intervel as per the use case in meters
distanceTrackingMethod.distanceFilter = 10

// Start the tracking with the above created custom tracking method
Roam.startTracking(.custom, options: distanceTrackingMethod){ status, error in

}
Time Interval Tracking
Type
Unit
Unit Range
Time Interval
seconds
1s - 10000s
Time between location updates example code:
// Define a custom tracking method
let timeTrackingMethod = RoamTrackingCustomMethods()

// Update the settings for the created method as per need
timeTrackingMethod.activityType = .fitness
timeTrackingMethod.pausesLocationUpdatesAutomatically = true
timeTrackingMethod.showsBackgroundLocationIndicator = true
timeTrackingMethod.useSignificant = false
timeTrackingMethod.useRegionMonitoring = false
timeTrackingMethod.useVisits = false
timeTrackingMethod.accuracyFilter = 10
timeTrackingMethod.desiredAccuracy = .kCLLocationAccuracyNearestTenMeters

// Update the time intervel as per the use case in seconds
timeTrackingMethod.updateInterval = 10

// Start the tracking with the above created custom tracking method
Roam.startTracking(.custom, options: timeTrackingMethod){ status, error in

}
Location Listener
To listen to location updates, create a class that implements RoamDeleagate and then call Roam.delegate.
Set your RoamDeleagate in a code path that will be initialized and executed in the background. For example, make your AppDelegate implement RoamDeleagate, not a ViewController. AppDelegate will be initialized in the background, whereas a ViewController may not be.
import UIKit
import Roam
import CoreLocation

@main
class AppDelegate: UIResponder, UIApplicationDelegate, RoamDelegate {
    func application(_ application: UIApplication, didFinishLaunchingWithOptions launchOptions: [UIApplication.LaunchOptionsKey: Any]?) -> Bool {
        Roam.delegate = self
        Roam.initialize("YOUR-SDK-KEY-GOES-HERE")
        return true
    }
    func didUpdateLocation(_ location: RoamLocation) {
        // Do something with the user location
        // location.userId
        // location.activity
        // location.timezoneOffset
        // location.recordedAt
        // location.batteryRemaining
        // location.networkStatus
        // location.metaData
        // location.location.speed
        // location.location.horizontalAccuracy
        // location.location.verticalAccuracy
        // location.location.altitude
        // location.location.course
        // location.location.coordinate.latitude
        // location.location.coordinate.longitude
    }
Batch Configuration
Batch configuration lets you control the number of location data updates being received in the location listener with the desired frequency and window.
Set Batch Configuration
As the name suggests, this method sets the configuration parameters.
The
networkStateindicates the state in which the updates are to be received. It can either be set to online, offline, or both.The
batchCountindicates the size of the location batch.The
batchWindowindicates the time interval for every consecutive update (frequency of updates).
// let networkState:RoamNetworkState = .Both
// batchCount: number of location updated
// batchWindow : frequency of location updates.
Roam.setBatchReceiverConfig(networkState: networkState, batchCount: batchCount,
batchWindow: batchWindow) { config, error in
      // error?.code
      // error?.message


      // config?.batchCount
      // config?.batchWindow
      // config?.networkState
 }
Consider the following call,
Roam.setBatchConfig("networkState.Both", 5 , 60)
The batch count value is the number of location updates sent in a batch. In the above case, the value is set to 5. Ideally, the SDK sends 5 updates per batch and the batch window (in the above case, 60) specifies the number of seconds the SDK waits to receive five location updates.
If the SDK receives 5 location updates in less than 60 seconds, the updates are pushed to the listener. If not, it waits for 60 seconds and pushes the location updates regardless of the batch count value.
Success Callback - We receive a list of BatchReceiveConfig objects.
Example response:
[{"batchCount":5,"batchWindow":10,"networkState":"offline"}, {"batchCount":5,"batchWindow":10,"networkState":"online"}]
Error Callback: We receive a RoamError object in the error callback.
The available details to get from the RoamError object are: error.getMessage() and error.getCode()
Get Batch Configuration
The get receiver config method allows the user to get the current batch configuration for the location listener.
Roam.getBatchReceiverConfig { config, error in
      // error?.code
      // error?.message


      // config?.batchCount
      // config?.batchWindow
      // config?.networkState
}swifReset Batch Configuration
The Reset Batch Configuration method allows the user to reset the batch config for the location listener.
Roam.resetBatchReceiverConfig { config, error in
      // error?.code
      // error?.message


      // config?.batchCount
      // config?.batchWindow
      // config?.networkState
}Last updated
Was this helpful?